
16 minutes read
The #1 reason concrete repair work fails is poor preparation – literally and figuratively.
Anyone can rent a shabby office, grab a sharp instrument, and call themselves a dentist – that doesn’t mean they’ll fix your smile or minimize your suffering. And it certainly doesn’t mean they should immediately blame the tool or environment when results are poor.
It’s time for construction pros to place higher value on the work before the work. This commercial concrete repair guide is all about putting you in a position to succeed when it comes time to pump, pour, or trowel.
Concrete Repair Guide: Before You Pour
You may already know how to repair concrete surfaces, but can you solve for efficiency and durability? Re-examine your process in these six areas before starting your next concrete surface restoration project:
- Understand the “what” & “why”
- Test for the unknown
- Weigh repair vs. replacement
- Surface prep
- Mixture prep
- Don’t delay simple repairs!
1. Understand the ‘What’ & ‘Why’
Concrete is usually good about telling us when it needs restoration or repair, so keep your eyes open.
The root of the problem could be:
- Exposure to elements
- Chemical attack
- Lack of maintenance
- Vehicle impact
- Improper rebar placement
- Improper installation/curing
- Ineffective moisture barrier (for slabs)
You’ll also need to identify the type of damage you’re dealing with. Common concrete problems include:
- Cracks – Breakage due to tensile strain; can be due to drying shrinkage or poor curing
- Spalling & scaling – Flaking or popping out, often due to poor installation or repeated freezing and thawing
- Corrosion – Erosion and structural damage to concrete or its reinforcing steel
- Buckling – Where sections of a slab are forced up and break because their base shifts
Understanding current failures and future risks will help you avoid repeating history. It’ll also help you choose the right concrete repair system. Choosing products for this type of work is always case-by-case; don’t assume the last project’s materials will work for the next.
2. Test for the Unknown
Even a talented dentist needs X-rays to diagnose issues they can’t see alone. While the signs of concrete damage are often surface-level, there are other issues (both existing and potential) you should check on before diving in.
Are there existing coatings on the surface? Any chemical contamination or incompatible materials present that could impact coating adhesion? Does it have a poor aggregate composition? Any potential sources of moisture problems?
There’s no shortage of tests you can perform to start your concrete restoration project on the right foot:
|
Test Type |
Advantages |
Destructive? |
Uses |
|
Pull-Off |
Predicts adhesion strength of materials applied to repair surface |
Yes |
Coatings & overlays; where conventional testing isn’t feasible |
|
Coring |
Full story on material makeup (mix distribution, contaminants, etc.) |
Yes |
Deck membranes; when material is applied (i.e. sealer) |
|
Checks moisture level of concrete for coating adherence |
No |
Coatings & flooring; diagnosing ingress & condensation |
|
|
Galvanic Pulse |
Real-time data on corrosion rate of steel embedded in concrete |
No |
Assessing integrity of reinforced structures |
|
Ground-Penetrating Radar |
Detects voids, cracks, joints, & embedded components |
No |
Inspection of buildings, roads, & bridges; locating embedded objects |
|
Load |
Provides direct intel on load-bearing capacity of structure |
No |
Assessing structural viability; when changes in use are in play |
|
Sounding |
Quick & low-cost way to ID delaminated or hollow concrete |
No |
Detecting delamination in bridge decks, pavements, other flat surfaces |
Many of these tests offer below-the-surface insights into the condition of concrete structures. This information will help you produce results that are reliable and safe.
3. Weigh Repair vs. Replacement
Consider the efficiency of repair vs. replacement concreting for the compromised area. Don’t just think about your project calendar; think about the end customer’s satisfaction too.
- Damage severity – Minor cracks or surface issues usually only need repairs, but it may be safer to replace areas with deep cracks or widespread corrosion.
- Cost-effectiveness – Repairs are often cheaper up-front, but if the damage is extensive or the area is prone to recurring issues, the owner might prefer full replacement.
- Timeline – If the project schedule is tight, quick repairs might make both sides happier, as long as you don’t compromise structural integrity.
- Aesthetics – While repair materials can blend somewhat into the existing look, they might still be annoyingly visible.
- Future use – If usage intensity or load requirements might increase someday, replacement with higher-grade materials might be more beneficial.
Structural engineers and concrete specialists can help you align your decision with safety, budget, and project objectives.
4. Prep the Surface Carefully
Use of most concrete repair materials requires some level of surface prep. Think of a window: Before you seal the pane, you always make sure the glass is clean, right? It’s the same idea with concrete.
No matter how fancy your repair product might be, a poor understanding of how to prep concrete for crack repair will always undercut your work.
|
Prep Method |
Use Case |
How It Works |
|
Low-impact methods |
Surface profile is in decent shape and doesn’t need altering |
Low-pressure power washing, scrubbing with detergent, vacuum cleaning |
|
Blasting methods |
Surface profile is heavily compromised |
Abrasive blasting, vacuum shot blasting, scarifying, needle scaling, grinding, rotomilling |
|
Mechanical roughening |
Easily removing deteriorated concrete |
Jackhammers, drills, scabbling |
|
Primer |
Ensuring adhesion and uniformity of coating |
Urethane caulking, gel- or water-based epoxy, stain blockers, concrete profilers |
|
Two-cloth wipe |
A more technical cleaning method for sealants |
One cloth to clean it, and one to remove the resulting residue |
|
Sweeping |
Cleaning before and after blasting or etching. Not acceptable as standalone option |
Sweep dust and dirt off the surface the old-fashioned way |
(Garvin Tip: You can find deeper specifics in the ICRI standard for concrete surface preparation.)
Part of a successful repair is identifying and removing weakened concrete and coatings. Look out for any embedded components, such as steel reinforcement, post-tensioning cables, and electrical conduits. Get rid of any concrete that’s near corroding steel.
Your choice of removal method should depend on the concrete’s properties, level of damage, and any contamination present. Mechanical removal normally leaves the surface rougher than blasting. Heavy-duty methods can cause tiny cracks that sap bond strength, so be careful. Sandblasting or water-jet blasting after the use of heavy mechanical methods can brush away the cracking and give you a smooth surface again.
You’ll usually need to clean the remaining surface, too. Loose debris, dirt, and other contaminants can harm the bond strength of the new material.
Don’t skip this step! We’ve seen expansion joint sealants fail within 3 months because the user didn’t clean the surface before applying sealant. Then you have all parties pointing fingers, arguing over the bill for rework, when coring the concrete will show who’s really to blame.

What About the Reinforcements?
Steel often supports concrete, and it’s a vulnerable material when out in the elements. Don’t forget to give any reinforcements some TLC, too.
Cleaning reinforcing steel is often easiest with a non-oil sandblast. This wipes all the rust and loose mortar from the surface. Some heavily degraded components may need replacement or supplemental supports.
Sometimes coating the rebar or other reinforcement may need recoating. A zinc-rich product is ideal for durability, as it slows the return of rust.
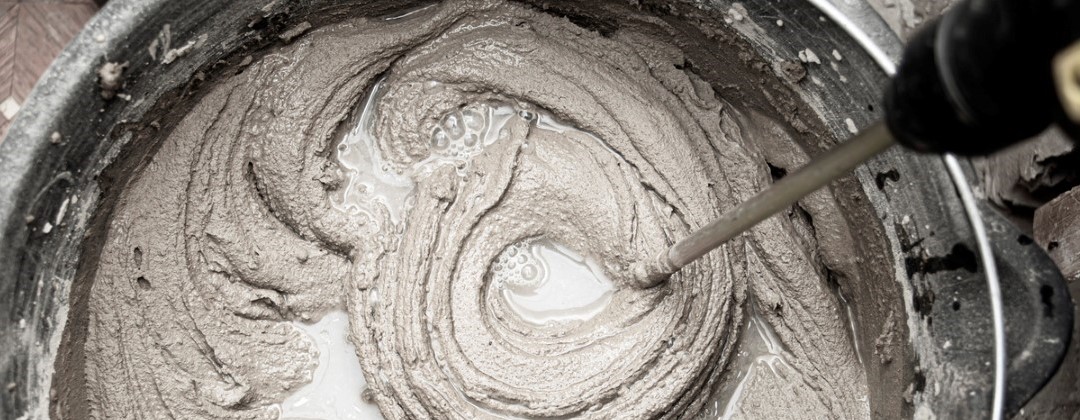
5. Prep the Mix
Since this is a guide to prepping for concrete repair, we won’t cover the actual pouring of the material. Besides, the construction world doesn’t talk enough about mix composition’s impact on success.
The key to preparing an effective concrete mix lies in understanding the surface requirements and selecting the appropriate profile.
The International Concrete Repair Institute’s CSP (Concrete Profile Standard) exists in every technical data sheet. Get to know it if you haven’t already:
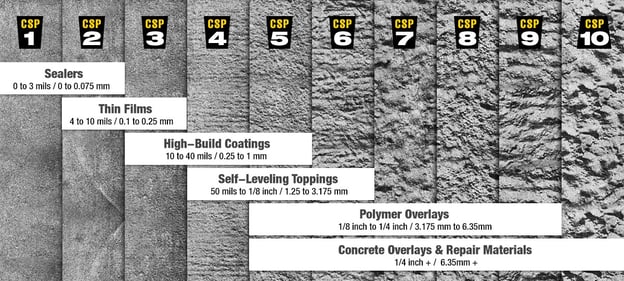
The chart guides professionals in determining how much surface profile is necessary to successfully apply concrete coatings and overlays. CSP ratings range from 1 to 10, with each level representing a degree of surface roughness.
|
Level 1 |
Level 10 |
|
|
Surface Type |
Very smooth |
Levels and mountains |
|
Preparation Type |
Light shot blast |
Hydroblast |
|
Ideal For |
Simple sealing, deck membranes |
Major changes, concrete overlays |
On the light-duty end of the spectrum is level 1, where perhaps you’re putting down a sealer product. Yes, you could put that sealer down on a level 10 application, but you’d use a ton of product because the mountain-like texture creates a much larger surface area.
A level-10 example would be removing less than 1 in. of concrete on a whole, monolithic surface, and you only need a thin overlay with cement products.
(Garvin Tip: Material strength and surface area also impact the overall influence of interface roughness on bond strength.)
Of course, surface profile isn’t the only factor in concrete mix design:
- Water quality – While most potable water can create concrete with the right consistency, its composition can impact the mix's properties, so test it first.
- Water-cement ratio – Be mindful of its influence on setting times, strength development, & workability.
- Workability – Focus on the concrete’s designed slump to ensure you can handle it without issues and it meets application requirements.
- Durability – To ensure the concrete reaches and maintains strength requirements after curing, test the mix on-site and adapt it as necessary.
- Tools – The proper specific mixing paddle – concrete, sealants, deck coatings – to help with airflow. (You wouldn’t use a whisk to prepare pizza dough!)
6. Don’t Delay Simple Repairs!
Our final tip is simply this: Get moving.
If you’re the property owner, or otherwise have control over site work priority, remember that time is your enemy. Every storm, freeze-thaw cycle, and exposure to pollutants makes bad concrete even worse.
Letting little concrete problems go can turn a simple fix into a major time sink. Proactive concrete maintenance is easier on the owner’s wallet and the contractors’ schedule and skill set.
There are simple ways to keep concrete lasting longer:
- Clean the surface regularly
- Fill cracks as soon as they appear
- Clear joints of debris that reduce flexibility
Staying on schedule is especially important when it comes to cold-weather concrete repairs. The construction season is limited; make sure you finish repairs before winter or grab special low-temperature products.
|
Concrete Prep FAQsQ: What Tools Will I Need?A: You'll need a mixing solution of course, and it'll need to match the scope of your project. Ready-mix concrete is delivered to the site for efficient, consistent large-scale work; portable mixers operate on-site to give you more control over composition and placement. To improve results and speediness, your mixing paddle should match the mixer or drill type, the concrete's viscosity, and the ideal mixing motion. q: How Does the Environment Affect Concrete Repair?A: Environmental factors like temperature and moisture can hamper the repair's longevity and structural integrity. High temperatures can rapidly evaporate water in the concrete, leading to improper curing or cracks, while low temperatures may delay curing and weaken the bond between new and existing concrete. A humid day can also affect the drying process, causing uneven adhesion. Adjust your repair methods to your surroundings by using cold-weather admixtures in low temperatures or misting surfaces in hot, dry conditions. Q: What Are Safety Best Practices for Repair?A: Beyond the basics (like using your tools properly), workers should identify and mitigate hazards by inspecting the site carefully and dressing the part. Look for loose concrete, sharp edges, or unstable surfaces before starting repairs. Only use high-VOC bonding agents and sealants where there is proper ventilation. As for the workers themselves, they should wear appropriately durable googles, gloves, dust masks, and steel-toed boots to prevent injuries and unhappy eyes.
|
Other Concrete Repair & Restoration Pro Tips
It’s not always the weather’s or product’s fault when a concrete repair job goes bad.
Concrete repair preparation requires high-quality workmanship and products working in tandem. Much like a dentist, you’ll need to remove the rotten elements and clean the remaining surfaces before a smile-worthy result is possible. Committing each tip to memory will help you build smarter, faster, and better.
For more education on concrete repair and restoration, grab a copy of our free e-book:
(This post was originally published in November 2023 and was recently updated.)